Sunday, June 28, 2009

Take Better Fishing Photos!


A couple weeks ago, I was perusing through the Field and Stream website, and I found a great article on how to take better pictures while fishing.

Field and Stream: The Beginner's Guide to Better Fishing Photography

Some of the concepts in it are kind of obvious, but I think it is a helpful article for anyone who likes outdoor photography. I'm personally using an old and beaten up digital camera to take all the pictures on my blog, and I would say the article has definitely helped me take some awesome pictures.

If you enjoy outdoor photography, take a few minutes and give it a look. I don't think you'll be disappointed.

Saturday, June 27, 2009

Early Morning Catfish

Have you ever had one of those mornings when you head to the field or water and everything just seems to work out perfectly? This morning was one of those days in my neck of the woods! Brad (my hunting and fishing sidekick) and I headed out at 5:30AM to a nearby lake to find a few decent bluegills with our flyrods. It was the most picturesque morning I've ever seen! A cool breeze blew from the southeast, which was a relief from all the scorching-hot weather we've had the past week. With little luck for the gills, however, we moved to a different lake down the road.

We managed a few gills there, but nothing with size. We kept a few smaller fish for bait and headed to where a creek flows into the lake. We rigged up the fish on our catfish rods (which we always keep with us for such an occasion) and tossed our bait into the creek. Within 3 minutes of my bait being in the water, I felt a hefty tug on the line and pulled in a nice 5 1/2 pound channel catfish from the creek. As I was working the treble hook out of the fish's mouth, Brad pulled in a channel cat a little over 6 pounds!

Within the next hour, Brad managed to snag into this brute: a nine pound channel catfish. When he reeled it in, we saw a large wound on the fish's side. This wound we could only guess to be from a large snapping turtle. I originally thought it could have been from a boat motor prop, but the wound is on the bottom side of the fish, which suggests something was trying to make dinner out of him!

We both managed to get a few more bites this morning, but no more fish. Either way, we were not at all disappointed with how well the trip went. It was amazing catching fish out of a small creek. Those cats sure put up a great fight. All fish were successfully released in the water to fight another day. I hope to head back soon and try my luck again.


Friday, June 26, 2009

Preparing for Bow Season - Episode One: Fletching Arrows

In light of many new articles that have been written regarding early bow preparation, I have decided to heed their advice and start preparing now. For the first episode, I've decided to tackle a project that I've been needing to complete for a while--refletching arrows. Last year's bow season snuck up on me very quickly. If I recall correctly, the season began October 1st, and I didn't even get my bow off the rack until mid October. Knowing the best part of the season was approaching, I refletched only a few arrows...and did a poor job refletching in my haste. I did well enough to get by for the season, but I've decided to get all my arrows fletched and ready to go so I can get some well needed practice before October.

Materials:
1. Vanes or Feathers: The vanes I shoot are called Blazers by Bohning Archery. They are 2" long and made of rather durable material. The vanes I'm using are neon(they might not look neon in the pictures) pink and yellow. I've found when I go to a range to shoot with others present, I always hear, "Nice pink vanes, sissy." I choose pink for one reason: visibility. If you've ever shot at an animal when it gets close to dark, you know you want to see as much of that arrow as possible. Pink is the only color that allows me to do this well. I've tried many other colors: Orange/yellow are not easy to see after the shot. The vanes blend in with the colors of changing leaves--White is a bust when it snows. Pink is a great color that doesn't really blend in with anything and is easy to pick up. I'm using one yellow vane for these arrows just to use them up.

2. Fletching Jig: I'm using an Arizona EZ Fletch jig that is made specifically for carbon arrow shafts. It is set at a right helical, as well. I prefer this jig above others because of its retail price (significantly cheaper than other jigs), ease of use, and the speed/efficiency it can get arrows fletched.

3. Fletching Adhesive: Cheap and relatively easy to find.

4. Pocket Knife: Some people go all out and by a tool that strips vanes/feathers, but I'm cheap.

5. Rubbing Alcohol/Rag: Use for cleaning the shafts after they have been defletched

I'm shooting Gold Tip XT Hunter 7595 carbon arrows. Gold Tip was the first brand of carbon arrow I had, so I've decided to stick with them ever since. I can't say I've ever had the slightest complaint with them.

To start the process off, you need to strip off the old or damaged vanes you want to replace. I use a sharp pocket knife for this process. After the vane is stripped off, you'll probably find glue and small pieces of vane still stuck on the arrow shaft. Use your pocket knife and gently scrape off the old glue. Make sure you are careful with this process--you don't want to gouge the arrow. As you begin to scrape, you might find that you're scraping what looks like dark powder along with the glue. You're scraping into the arrow now, but don't worry. I've done this many times and have never had a problem. Just be careful you don't gouge the arrow--keep it smooth. If you're unsure if you've scraped too far, give the arrow a bend test to see if cracking occurs. If it doesn't, you should be good to go.

After you get that taken care of, use your rubbing alcohol and rag to clean the arrow. I want to say I've heard people using denatured alcohol for this process, but I've used rubbing alcohol for a few years now and have found that it cleans the surface well for the adhesive.

Next, place your vanes in the fletching jig and apply a thin line of adhesive to them. Make sure it is thin--a thick line of adhesive will create thick globs of glue alone the edges of the vane. Also, make sure you get adhesive all the way to the tips. You want as much of that vane glued to your arrow as possible. **Helpful tip: Make sure your vanes are all pointing the right direction when you put them in the jig. There is nothing worse than taking the time to do this job and getting an arrow with a backwards vane. **Helpful tip 2: Make sure the vanes are pushed all the way down into the jig so they are even with each other.

Once your glue and vanes are in place, put the arrow into the jig. This particular jig has three arms that fold up around the arrow shaft. A small piece comes over the three arms to keep them in place. Then the whole jig is moved into a "locking" position. This ensures the vanes will not move once they are set in the jig. I usually leave the arrows in the jig for 3-5 minutes (or however long it takes me to ready another arrow for gluing.

When it comes time to take the arrow out of the jig, be very gentle with the vanes. The 3-5 minutes gives the adhesive long enough to stick decently to the arrow, but they are still very fragile. Many people will leave the arrows in the jig for 15 minutes a piece. If you're fletching a dozen arrows, 15 minutes a piece turns into hours of waiting. If you're careful, 3-5 minutes should be enough to get the vanes attached to the arrow sufficiently.

In my own opinion, the next step is the most crucial. Take your adhesive and put a small bit of a glue on the tips and ends of each vane. The tip of the vane comes in contact with so much air flow during a shot, a vane that isn't glued down well in the front will rip right off. As the arrow flies, the vane creates a significant amount of drag which will affect the back half of the vane. Again, if not glued properly, the vane will rip right off. I also like to see a thin line of glue coming out of the sides of the vanes. This shows that there was enough glue on the vane to make a good connection. If the sides of your vanes look like they lack glue, run a very thin line of glue along the side.

Allow your arrows to dry for 12-24 hours before shooting. The longer you allow them to dry, the less you have to worry about them coming off.

Fletching your own arrows has many advantages. I started mine because I hated paying labor costs at a shop. By doing them myself, I have the ability to fix them whenever I want or need to. No more waiting a week for the shop to get around to finishing them. Another advantage is that I can buy vanes in bulk for a relatively cheap price. I usually buy packs of 100 Blazer vanes. By having an abundance of materials, I can work on grouping my arrows and not worry about mangling my vanes in the process. Lastly, there is is nothing like finishing your own arrows. By choosing your vanes and doing all the work yourself, you are personalizing your arrow. Taking an animal with one of your own arrows is just a cherry that tops the sundae.

Blogger Plagiarism: Is Someone Stealing YOUR Posts?


Albert Rasch over at The Rasch Outdoor Chronicles has found out through the grapevine that his posts, as well as posts of others who belong to the Outdoor Bloggers Summit, have been plagiarized!! Here is a link to his post--check it out!!


Tuesday, June 23, 2009

The Hunt for Monster Gills: Take the Path Less Traveled


For the past few weeks, my bluegill intake has been meager at best. The gills I’ve caught are not only few and far between, but they have been seriously lacking size. A good sized bluegill on a light fly rod is an amazing experience. Small gills just don’t put up a great fight. I’ve been racking my brain trying to find the monsters I encountered during the spawn. I’ve covered every inch of shoreline that I usually fish with no luck. That is when I decided I was going to have to go beyond where I usually fish. Sometimes you need to take a path less traveled to find the big fish. Seven miles south of my hometown is a state park that offers fishing, boating, and hiking around the lake. Those who use the park for casual fishing often fish the shores next to the parking areas. Yesterday, however, I decided to take a path less traveled and walk the miles of trails around the lake in search of monster gills hiding from the conventional fisherman

The catch—it was a scorching 94 degrees with thick humidity in the air. Iowa is known for its outlandish weather patterns: burning hot in the Summer, freezing cold in the Winter, and enough precipitation throughout the year to flood just about anywhere. Even with the high heat, I decided to make the trip anyway. Equipped with my fishing gear, a gallon jug of ice water, and a comfy pair of shoes, I made my way down miles of shoreline trails in search of the mighty gills.

After hours of an exhausting hike with many unsuccessful stops at different openings on the shore, I finally found a remote corner that was exactly what I was looking for. A tree had fallen in the water close to the shore, making ideal cover for all types of fish. This spot also appeared to have very little fishing pressure since it was well away from parking areas. Within minutes, I had located an area with monster gills.

When the day was over, I really felt like I accomplished something. I was exhausted and soaked from my hike, but I set out with a goal to find fish—and I did. For the whole day, I only caught around 15 fish, but I really worked for those fish, and each one was worth it. Take my advice: the next time your fishing gets into a slump, get away from where you normally fish and put in some leg work to find the big ones. At the very least, you get some great exercise and an excuse to get in the outdoors.

Sunday, June 21, 2009

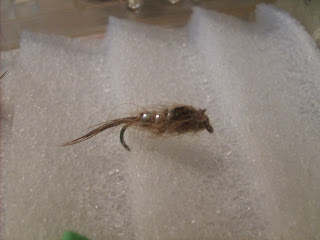
A Tip of the Hat Goes to the Hare's Ear Nymph

Yesterday, I embarked on a little fishing for a few hours after some Father's Day festivities. The temperature was quite high (low 90's in the sun), and the fish were definitely not that interested in feeding. In the early evening, the bites began to pick up, but the aggressiveness all fishermen seek just wasn't there. I decided to throw on something I have never used before: a Hare's Ear Nymph. This is a fly I just started tying last week after acquiring more proper materials for its construction. While this is a proven fly for those who fish for trout, I was more than surprised on how well this fly worked on bluegill and crappie. I tied this fly on a size 10 wet fly hook, which made it small enough for the fish to get ahold of, even with a non-aggressive bite.

Hare's Ear Nymph

Hook: Size 10-18
Thread: Tan/off-white
Body: Tan/Light brown dubbing (whatever matches the thread)
Top of Body: Pheasant Tail Fibers
Tail: Pheasant Tail fibers
Added Weight: 4-5 wire wraps towards the head of the hook
Ribbing: Silver wire

Thursday, June 18, 2009

Calling All Those Who Fly Fish Trout--Please Respond!!


Last weekend, I embarked on another visit to the Iowa trout streams in Delaware County. I was surprised at my enthusiasm towards this trip--the last trip I only caught two fish, while my friend caught well over a dozen. Not to mention, I probably lost over 20 flies the last time I was there. I prepared this trip with roughly 60 new flies I tied earlier in the week. I was definitely excited to try a few new patterns. I was also anxious to get out and do a little camping.


When the first day was over, I had a grand total of zero fish and zero bites. I wasn't too surprised or disappointed by the outcome...I was more or less expecting it. Later on, we got to our camping site just in time for a large thunderstorm to start rolling in. We hadn't built a fire yet, and we were getting worried we wouldn't be able to cook our deer-cheeseburgers. We finally got the fire started and created a canopy out of branches and leaves. This kept the fire dry enough to stay burning during the rain. With no grill to cook the burgers on, we found a nice and flat piece of sandstone from the stream behind our campsite and put it right on the coals. The burgers cooked up very well, and we had a delicious supper--minus the soaking downpour.


The rain had passed by morning, but the streams went from crystal clear water to the color of chocolate milk. I would say this made the fishing worse, but I actually managed to catch a nice little Rainbow Trout and had a few bites that morning. Later in the afternoon, we couldn't even get a bite. Feeling defeated, we came back to our neck of the woods in Central Iowa to catch some bluegill.


So here is the big question I have for those who flyfish trout: What kind of technique do you use to catch trout? Do you cast upstream and let the fly float to you, or do you cast down stream and pull back towards you? What types of flies/size of flies do you have the best luck on? Do you give the fly action, or do you let the stream just take it? I started flyfishing for bluegill on a decent sized lake with poorly made foam spiders. For the past ten years, I have honed my skills and have become great at catching bluegills, but when I get to a stream with moving water and rather picky fish, all those years of bluegill fishing seem to be useless. Please leave some feedback on what catches you fish. I'll take any tip you can possibly give.

Monday, June 8, 2009

Productive Catastrophe


Four years ago, I decided to do something I told myself I would never do...fish my two Abu Garcia reels on the river. Sand and sediment from rivers can take quite a toll on fishing reels, which I found out first hand about two years ago. My Abu Garcia 5000 Baitcaster got so much junk inside it that casting became impossible. I figured the reel had a decent life, so I retired it to the compartment between the front seats of my Jeep...which is where it has sat ever since (a sad resting place, indeed). I didn't have the heart to throw it away; only a couple years earlier I caught an 18lb. Channel Catfish with that reel. It was a veteran in my tackle, and I wouldn't part ways with it. I pressed on with my other Abu Garcia 5500-C3 Baitcaster. Last week, I heard the infamous shrill squeaks of sand-on-metal when I casted into the water. I knew I would have to take it apart and clean it, but I was very hesitant to do so. I had heard dealing with the innards of a baitcaster was like mastering the Rubik's Cube, which I'm certainly not good at. I decided, however, that I would take on the task, but I would try it on my 5000 first.


I had never taken apart a baitcaster before, so I began taking off the screws to the casing and reel assembly, trying to make sure I kept everything in an order. As I pulled off the outside casing, a small explosion of pieces erupted onto my work space. My veteran baitcaster had become a heap of pieces.


My heart sank into my chest. I had pieces in my hands that I couldn't identify or see where they originally attached. My first thought was that I had ruined this reel completely. There was no way I could possibly put it back together. I instinctively stopped what I was doing and went straight to google.com to search for a rebuilding schematic. The best I could find was a series of unhelpful maintenance pictures that weren't helping me rebuild. After several more minutes of searching, I finally came across a 2-part youtube video that proved to be an amazing lifesaver.


The gentleman in the video completely disassembled an Abu Garcia reel for cleaning and showed how to put it back together piece by piece. The videos are a little out of focus, so it took a lot of replays to figure out where some of the pieces went. Once I got the reel back together, I felt confident enough to take it apart again to clean it. When it was reassembled, I couldn't believe at how well the reel performed! Everything worked out so well, I decided to work another hour and take apart the 5500-C3 for a thorough cleaning.


While the outer casings have taken quite the beating, the moving parts on the inside are looking and feeling like they are brand new. Both of these reels have taken their spots back as two of my favorite reels in my fishing arsenal. These reels are still destined for the river, however. As far as bass fishing goes, they have been replaced by a brand new Abu Garcia 5500-SSC4, one of the smoothest reels I have ever used.

With the success of my fishing reels, I decided to finish the day strong and completely reorganize my fishing tackle. Until this day, I've had my tackle scattered in two or three different tackle boxes. My bass tackle would be thrown in one tackle box, my pan fish tackle in another, my catfish tackle in the bottom of a bucket, and my fly fishing tackle in my backpack. After a couple hours of intense organization and condensation, I managed to fit all of my tackle into one medium sized tackle bag, allowing room for all the odds and ends (scale, knife, bug spray, etc.), that come in handy when I'm on the water.


This has been by far one of the most productive days for my fishing, and I didn't even make it to the water! By having my reels cleaned and my tackle organized, I know the next opportunity I have to fish will be an amazing one. The next rainy day you have, try some cleaning and organizing of your own. Hopefully you'll be as anxious as I am to hit the water and try out some of the changes you've made.

Saturday, June 6, 2009

I'm Alive!! - Summer Update


It has been quite a while since my last post, and much has happened since. As I've said before, I am a college student who tends to have limited time during the year. As finals began approaching in April, I decided to direct all my efforts towards ending the year on a good note (which I did-- 3.89 GPA). This success came at a significant price, however. My turkey hunting was cut tremendously short with only a Friday evening and Saturday morning hunt. Needless to say, it was another bird-less year for me. When school ended, I packed up from campus and moved in with my older sister who lacks an Internet provider. I decided to take a few weeks off for myself and dedicate it to fishing and other various outdoor odysseys. After many trips into the great outdoors and many photos of my adventures taken, I managed to find an Internet connection and am ready to share! Keep in touch-